| Links |
| Contact Us! |
| Equipment List |
| Camera and Film |
| Other Photos |
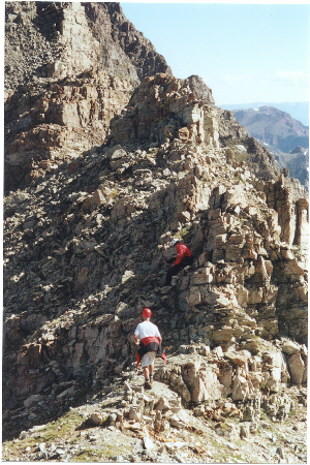
The Climb The grassy ledges. We arose at 4 a.m. under magnificent stars, ate, answered the call of nature (does anyone ever get used to it?) and finished packing using our headlamps. Then we symbolically crossed trekking poles over our extinguished campfire, dumped our headlamps (twilight was breaking) and hiked away from camp. It was 5:40 a.m. The trail begins with an ascent of the vast 2,800 foot high grass-covered slope to the west of the creek. It is known as the "grassy ledges" because there are many little 5 and 10-foot rock shelves to negotiate. The trail up the wall is a mile long and is pitched at a consistent 32 degrees ... a 53% grade. It is neither technical nor dangerous (unless you start rolling) and a slow, consistent pace gets the job done. We averaged 800 vertical feet per hour without burning ourselves out. Some four-pointing was involved here and there. The early part of our ascent was in the cool shadow of Pyramid Peak (14,018 ft.), another tough Elk which loomed across the valley behind us. As the sun rose higher behind Pyramid, sunlight crept down the grassy ledges above us. By 8 a.m., we were in full sunlight on a glorious day. TIP: To find the start of the Southeast Ridge trail up Maroon, take the West Maroon Trail about 1.3 miles past Crater Lake. This trail eventually reaches some obvious camp sites in the last of the trees (where we camped). After these trees, the trail enters an open rocky area where the trail crosses West Maroon Creek (over a log). Just after you leave the camp sites and before you get to the rocky area, look on your right for two unusually tall cairns and a muddy path that goes straight up a 12 foot high grassy wall just beyond. The trail remains obvious for a while thereafter. Higher up, you may lose the trail periodically. TIP: From then on, you will be angling up and to the left for about 3 hours trying to acquire the saddle to the left of the rocky ridge above you. You will lose the path and re-find it a number of times. If you lose it, just keep heading for that saddle above you and to the left. You will negotiate many small rocky ledges and some snow gullies on the way. TIP: AVOID THE SNOW GULLIES!!! SOME ARE INNOCENT LOOKING DEATH TRAPS. They are just snow-filled gullies running straight down the mountain (see upper left of photo, below), but the snow often hides fast-moving ice water beneath. If you fall through, you could drown or become trapped in the icy water until you freeze. Your friends might not know where you are. Traverse above or below the gullies, or look for rock-filled crossing points.
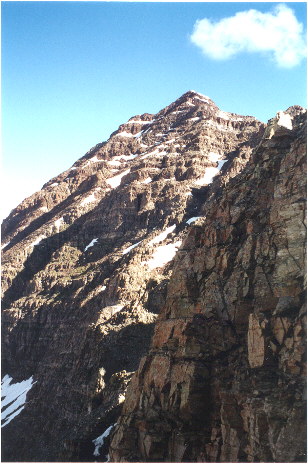
The grassy ledges are not particularly hard to climb, but they are a relentless test of your legs and heart. Get into a comfortable pace and stay with it. Loose rock can be a minor problem on the little ledges. Near the top of the grassy ledges, I heard Jace make a remark about "a mountain not being worth getting hurt or killed." I did not know why he said that on such safe teerain until three years later. Apparently, on one of the six-foot ledges, Joey dislodged a rock that almost smashed Jace's hand. All in all, the grassy ledges took us about 3 ½ hours (averaging 800 feet an hour) and put us on the grassy saddle next to the rocky southeast ridge of the mountain at 13,070 feet at about 9:30 a.m. We stopped to take a break near the top of the ledges and I took out my camera. As I framed the guys with the deep valley in the background, I commented to Jace (kneeling in the blue jacket), "it's too bad you can't photograph steepness." Steep slopes always end up looking like flat fields. Jace suggested that I "just turn the camera or something" and then looked away. So, I tilted the camera and fired. Well, it seems that you CAN photograph steepness after all. Entering the rock pile. Once on top the saddle, we turned right and entered the rocks at the base of the ridge. The entire mountain is one giant stack of loose rubble -- huge cliffs with ledges and gullies filled with either snow or loose scree. At the top of the grassy ledges, you are only 1,000 vertical feet below the summit, but still over a mile away. You have long ledge traverses to negotiate along the back side of the mountain, now visible. The loose rock threat is immediately evident. The difficulty of finding cairns in this ocean of loose rock is considerable. Some of the cairns are just 10 or 12 inches high, and you MUST find them to be sure of your route.
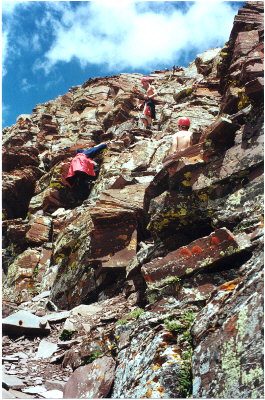
As we entered the rocks, we quickly came to two large rock pillars (visible in photo). The trail took us to the right of the first pillar and then we promptly lost our way. We thought that the trail might dive left between the pillars and into a deep hole. It did not. Jake found a cairn high and to the right of the back pillar. TIP: Pass both of the pillars on the right and then turn left above and behind the rear pillar. Look for cairns. Soon after we passed the two rock pillars, we started down a long ledge with the wall of the southeast ridge to our right. (On all ledges during the ascent, the wall will always be on your right.) Then, our ledge just ended. In the wall to our right, however, we saw a chimney (three-sided chute) in the rock wall. Thirty feet above, the chimney split into two higher chimneys. We had no idea which one to take and they were not marked, so we took both. I went left and Jake went right. The correct route is the left chimney. The left chimney continues up about 30 more feet and leads to the exposed Southeast Ridge and the correct route. The chimney requires some caution and slows you down a bit, but is fairly easy. TIP: At a dead end, you will come to a chimney (vertical chute of rock) on your right. Thirty feet up, the chimney splits. Take the left chimney. Above the chimney, you will pop up onto a "sidewalk in the sky", one of two on the route. A "sidewalk" is a narrow 1 or 2-yard wide line of boulders with cliffs off both sides. They are found when you arrive on the actual ridge of the mountain. The sidewalk rocks are on the order of a cubic yard each, but you learn not to trust even those. Remember: TEST EVERY ROCK.
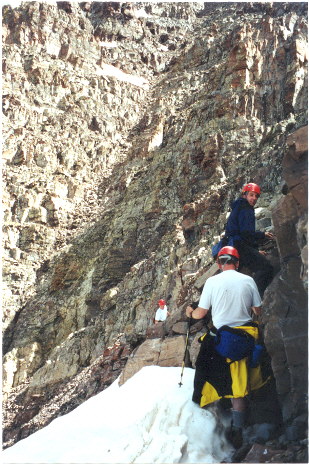
The sidewalk leads to another ledge along another steep face of rock. For a long while, you must traverse across the back side of the mountain on some very long ledges. These are not terribly exposed at all, but you are in serious danger of rockfall the entire time. Some of the books talk about "disappointing downhill sections", suggesting that you are giving up hard-fought altitude. We did not have that impression. There is nothing disappointing or frustrating about the climbing here. There are long level sections where we did not gain altitude. Forever, it seems, we stayed at 13,100 feet during a long traverse of these rotten rock walls. But it is fun and we did not lose any significant altitude. Most of the rocks move. You cannot even trust rocks the size of sofas. That is the singular overriding risk of the Bells. So, we tested constantly and made sure we were never beneath each other when climbing. Sometimes you can rely on a loose rock by using it only for light balance or by pushing it straight down toward the back or middle of the rock. To me, the most dangerous moment occurred when our ledge crossed a 10 foot wide snow chute. A slip there and it would be all over. The chute was pitched at 70 degrees and led to the top of a completely vertical rocky hole 100 feet below. But the risk was very brief. We dug in our feet very carefully and made firm pole plants. It was here that I told Joey about the "Pharaohs" -- the unseen risks of death that grab at you on a mountain. If you fail to see them, you "join the Pharaohs", i.e. the ages.
The backside of Maroon is a labyrinth. I would worry about finding the correct route if I climbed the mountain a second time! Careful route finding is important here. I have read that there are false cairns on the mountain, but we did not find any. We had serious need of the cairns we did find. They are reassuring. TIP: It is very helpful if the most energetic of your group trots ahead to find cairns, little piles of rock marking the route. TIP: Almost without fail, the correct route avoids snow-filled gullies. If you see a big long snow chute, chances are your route traverses just above it or just below it. Just look for cairns. TIP: The route looks different going down than it does going up. On the way up, look back periodically!!! For added safety, you could leave strips of bright ribbon on the cairns as you pass them. You should collect them on the way back. As we traversed across the mountain, we came to a large gully, visible below. We simply crossed this gully, finding a cairn and ledge on the far side. This put us on the main bulk of the mountain itself.
After traversing halfway across the main bulk of the mountain on a long ledge, we came to an even larger and steeper-sided gully filled with loose material. This gully separates the main massif of the mountain into two lobes. (The top of this gully corresponds with the prominent notch in the southeast ridge that is visible from Maroon Lake.) The gully is at least 30 feet wide and well over 300 feet high. It is by far the largest gully you will come to, and you will recognize it when you see it. It is protected by steep walls and is filled with sand and loose rock. You make a long and tiring uphill climb in it ... probably about 250 vertical feet. You backslide in the sand about 1 foot for every 2 feet you advance. You should pay attention to the point where you enter the gully so you recognize the exit ledge when you go down. This could be extremely critical if clouds set in. As I recall, the upper exit is a fairly obvious diagonal cut in the side of the wall on the left as you near the headwall that closes in the top of the gully. At the top of the gully, we were all tiring badly due to heat. We stripped to tee shirts or bare chests, stowed the excess clothes in the gully, took a food and water break, and then continued. Cooler now, we felt as if we had new batteries. TIP: The upper end of this large gully has some overhangs that would make good shelters in the event of storm. After the gully, the nature of the climbing changed. Now we had to climb small cliffs and gullies to access higher and higher ledges -- a trajectory best described as left, up, left, up, left and up. We searched for cairns the whole way. On a pretty day, it is not that hard to find your way. On a cloudy or rainy day, you could die trying. TIP: Remember, after the main gully, the route is a zig-zag pattern -- left, up, left, up, left, up, etc. Sometimes, ledges just end. When they do, you should look above you for a cairn on a higher ledge. You will have to four-point up a little cliff to find the ledge above you. These little cliff climbs are not terrifyingly airy, but they are potentially dangerous and you will have to deal with handholds and footholds on teetering rock.
CHECKLIST: Food for summit day:
The upper portion of the mountain was not very snowy, even though the other side of the mountain looked snowy from the trail head. The Southeast Ridge route has southern exposure and, hence, more sun and less snow than the northern exposure seen from the parking lot. We saw some long snow gullies on the Southeast Ridge route, but we only had to cross one very narrow one. We continued our ledge traverses and cliff climbs, always watching for cairns. It was nearing 1 p.m. and we were becoming a little concerned about our time and the afternoon weather risk. |